Wildlife photography on a budget
“Being a Wildlife photographer, our Bank balance will always be empty, but our hearts will always be full.”
But being a student, I have my own story of how I started to love photography and filmmaking, but never had a chance to afford the gear. But this common notion, I believe, is now becoming a thing of the past. In my quest for the best budget gear for Wildlife and Bird photography as a beginner, I was introduced to the mirrorless Olympus Micro Four Thirds cameras. They are light, compact and have a plethora of affordable lenses. With a tight budget of 400$ from my savings, I used to compare every camera of Nikon, Canon, Sony and Fujifilm for the best possible specs to get myself into shooting birds and wildlife. One fine day during my search, I came across a Youtuber (Rob Trek), who is an Olympus photographer. His videos helped me understand Micro four thirds systems, their advantages (especially how the dimensions and weight of the system matter while shooting) and compared them with the traditional APS-C and Full Frame sensors — I especially loved the fact that we could get 2X the the field of view of a standard Full-Frame sensor from a Micro Four Thirds (M4/3) lens system. That means, an MFT (Micro 4/3) lens with a focal-length of 150mm will have a similar field of view to a 300mm lens on a Full frame camera. Furthermore, these MFT lenses are quite affordable and travel-friendly due to their light-weight. In wildlife, the closer you are to your subject (without disturbing its privacy as well), the better the chances of getting a great pre-cropped picture. That was when I decided to get an Olympus system; I looked up for the best options on eBay, FB Marketplace, Swappa etc. and purchased a used Olympus OM-D E-M10 mark ii along with a 14–42mm f3.5–5.6 kit lens and a standard 40–150mm f4.0–5.6 telephoto lens for around 300$ from my savings! I was aware that I would not be getting the perfect quality and resolution for this setup, but, I knew it would be the most ideal option for me to get started.
The Setup for Birds in Flight and Wildlife: (Going technical now!)
One of the best features I love about the Olympus cameras is the Function button settings, I set my Function button Fn3 for Birds In Flight and Fn2 for still photos.
After resetting the camera settings, I chose the Large SF (Super Fine) + RAW from Shooting Menu 1. Later, from Shooting Menu 2, I made sure that the HDR and Multiple Exposure settings are turned off.
From the Custom Menu -> AF/MF I chose C-AF for Still Picture and turned off the Full-time AF. For the AEL/AFL to assign focus, I made sure that they are in S1/C2/M1 and S-AF is set to mode 1 and C-AF is set to mode 2. In the same Custom Menu itself, I turned off the AF illuminat. and Face Priority.
In the Button/Dial -> Button Function, I assigned my Fn1 button to Magnify to zoom in and focus lock a still subject while shooting. I chose Fn2 button to have My3 settings and the Fn3 button to have My4 settings which I would later assign to my Birds in flight and still photo settings.
For the Release Menu, I made sure that Rls Priority C and S are off, and my Image stabilization is off as I don’t have to worry about it while shooting continuous. I put my Release lag time to be short.
For the Exposure/ISO Menu, I turned my Noise filter off and set the ISO-Auto Set to a High limit of 6400. I chose the “CENTER WEIGHTED METERING” for metering and turned OFF WB auto Keep warm color in the Color/WB Menu. Make sure that Auto WB IS OFF!
S-AF (For Still/Slow Wildlife/Birds):

Notice that I am shooting in Aperture Priority mode and I have selected 9-point group focus since I don’t want my camera to focus on the entire frame. I can adjust my camera and move around to get my subject in these 9 point grid. Also notice that I had my Shutter to “Single Point Anti-Shock” i.e. the one with a Diamond next to a Rectangle in the picture above. You can see that I have it in the Maximum possible Resolution LSF+RAW (For Olympus bodies, Large Super Fine gives the best quality). I saved this to my Myset My3 button to change it quickly (That’s what I love about Olympus!).
C-AF (Continuous AF) for Birds in Flight:

I changed to Manual shooting mode and dialed up my Shutter Speed to 2000. I have set the Focusing to C-AF and “Continuous Low Anti-Shock” i.e. the Diamond next to a pair of Rectangles and an L (the worst way to explain).
AND NOW THE PICTURES! (The best part saved for the last).
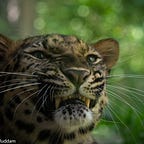
These were shot in Pittsburgh, we visited the Zoo and the Aviary. Unfortunately, I did not get to shoot Birds in Flight (BIFs) since it was a closed space and there were no birds flying around. I shot all these pictures using the standard Olympus M.Zuiko 40–150mm lens which you can easily get at around 70–80$ (used) or ~120$ (new). Pretty cheap compared to a Full Size camera’s lens with the same focal length. I later edited these pictures in Lightroom CC. Check them out in my Instagram as well.


I believe that Wildlife and bird photography requires a lot of patience and belief in the camera equipment. Although it is a well known fact that the quality of pictures improve with the price of the gear, I opine that Micro Four thirds systems can provide an affordable and a comfortable option for enthusiasts who are just getting started. Good luck!